
All of this is discussed below.
A solar panel, for maximum power, should always be pointing
directly at the sun (both side to side and up to down angles). For
unattended operation a solar panel should be facing due south as
it will then get the most sunlight possible as the sun traverses
the sky.
So point your fixed panel due South. Note that if you're shaded
on one or more sides by tall stuff like buildings or trees
you may choose to point more towards the open sun area to optimize
the amount of sun you get from that limited sun exposure.
The panel should also be tilted. It should not be horizontal. It
should not be vertical. It's tilt should match the sun. For
unattended operation a tilt of 30-40 degrees is optimal.
The main caveat to solar panel pointing has been on overcast
days. If you can't tell where the sun is - then the panel can't
tell either - so you want to point to where the most sun will hit
the panel. I've found that's pointing straight up to the sky. Flat
level. I only do this if it will remain overcast all or most of
the day. You still won't get a lot of power - but you may get 1 or
1 1/2 watts when you would have (at regular tilt) not received a
measurable amount. When you're trying to catch up - every little
bit helps.
A Compass, even a simple one such as off of a key ring, can be an
important part of your portable solar kit.A compass is important
for an unattended installation that will be left to charge while
you're away. For unattended operation a solar panel should be
facing due south as it will then get the most sunlight possible as
the sun traverses the sky. A compass can help you set this
accurately right away - especially at night or on overcast days.
Mine has velcro and sticks/stores into the back part of my fixed
base panel so I always have it with me.
These are the two that I'm using. There are others you may wish
to consider.
|
|
|
| Fixed Base10 Watt. I cut the
front pole down 6" so it wouldn't shade the cell. Pointing
due south and tilted 30 degrees. Poles are driven into the
ground. |
Tomato Stake Kit. From your
favorite garden center. They're very light weight. Or use Scouting
Skills and lash something up with found material. |
Sectioned Tomato Stake Kit.
Joiners are 5/16" dowels with a washer (a rope knot would
work too - improvise) |
That term - Use Case means that there is an Engineer
involved. And usually that's a good thing. Really. Trust me
(because I'm an Engineer) !
How do I use this? A significant advantage (=== Goal) of this is
to harness the wide variety of 12 V devices out there. By that I
generally mean charging adapters - but for some camp such as
Woodfield, Cherokee, or Raven Knob, it could well mean a fan for
nighttime comfort (I was insulted and left at home a 12V
camp fan my MIL gave my when I first took Webelo 1's to Woodfield
Scout Reservations, and I regretted that! Too Hot! Need Fan!).
So for this setup what you should think about is using and / or
acquiring the appropriate 12V car/rv power adapters. You'll need a
cigarette lighter adapter from the auto store. Cut the plug off
(save for an adapter!) and adapt to hook to the battery. Now you
can use all of your car phone charger adapters and such.
This panel is a 10
watt panel by Instapark. It's about 12"x12" and is also a
reasonable size / cost point at about $39. This panel is quite
sturdy - intended for permanent outdoor installation. It is
somewhat heavy at about 2 1/2 #. It also has sharpish corners due
to the metal framing so do pack it in your duffel with cardboard
corners so it doesn't tear anything up. Easy enough - just take
note.
This panel is nominally a solid 7 watt panel in full sunlight.
This is not a defect 10 watt panel - but 70-75% of list is the
actual power you can expect, max, out of *any solar panel* without
an expensive MPPT solar charge controllert. But we're keeping it
simple - so this is 7 solid watts for actual calculations.
The leads are not long enough to reach the battery so will need
connectors and/or lengthening. This panel also does not include a
blocking diode. The diode is nice - but not required. We'll get
into that in the section on improvements.
What does a diode do? A diode lets current (i.e. battery voltage)
flow in only one direction and blocks it from flowing in the other
direction. Do I care? Probably not if you're in a hurry? Why do I
need it? Read on.
If a solar panel is hooked directly to the battery, i.e. not
using a solar charge controller, then the solar panel can
discharge the battery. That's right, the solar panel can discharge
the battery at night or during low sun (i.e. overcast) conditions.
Is this a problem? Generally it is not a problem if you take a few
things into consideration. This can also be permanently solved by
installing a blocking diode. Expensive panels come with them but
inexpensive ones do not.There are also advanced cases for putting
panels in series or parallel but those aren't covered here. Note
also that solar charge controllers, for which this simple solar
probably doesn't apply, will include this reverse discharge
protection.
The rate of discharge is relatively low - but for example, if you
have overcast conditions and aren't charging for a day or two,
this can eat up your reserve. It can also can make it easy to just
not worry about it esp when leaving a panel out to soak up
any possible rays when the weather is spotty.
So my recommendation is to install one if you have the time or
proclivity, and get around to it if you can't before Jamboree or
whatever upcoming activity. And just unplug your battery from your
panel at night or on very overcast days. It's all manageable and
nothing to get worked up about. It's just also nice to have in
place an not have to worry.
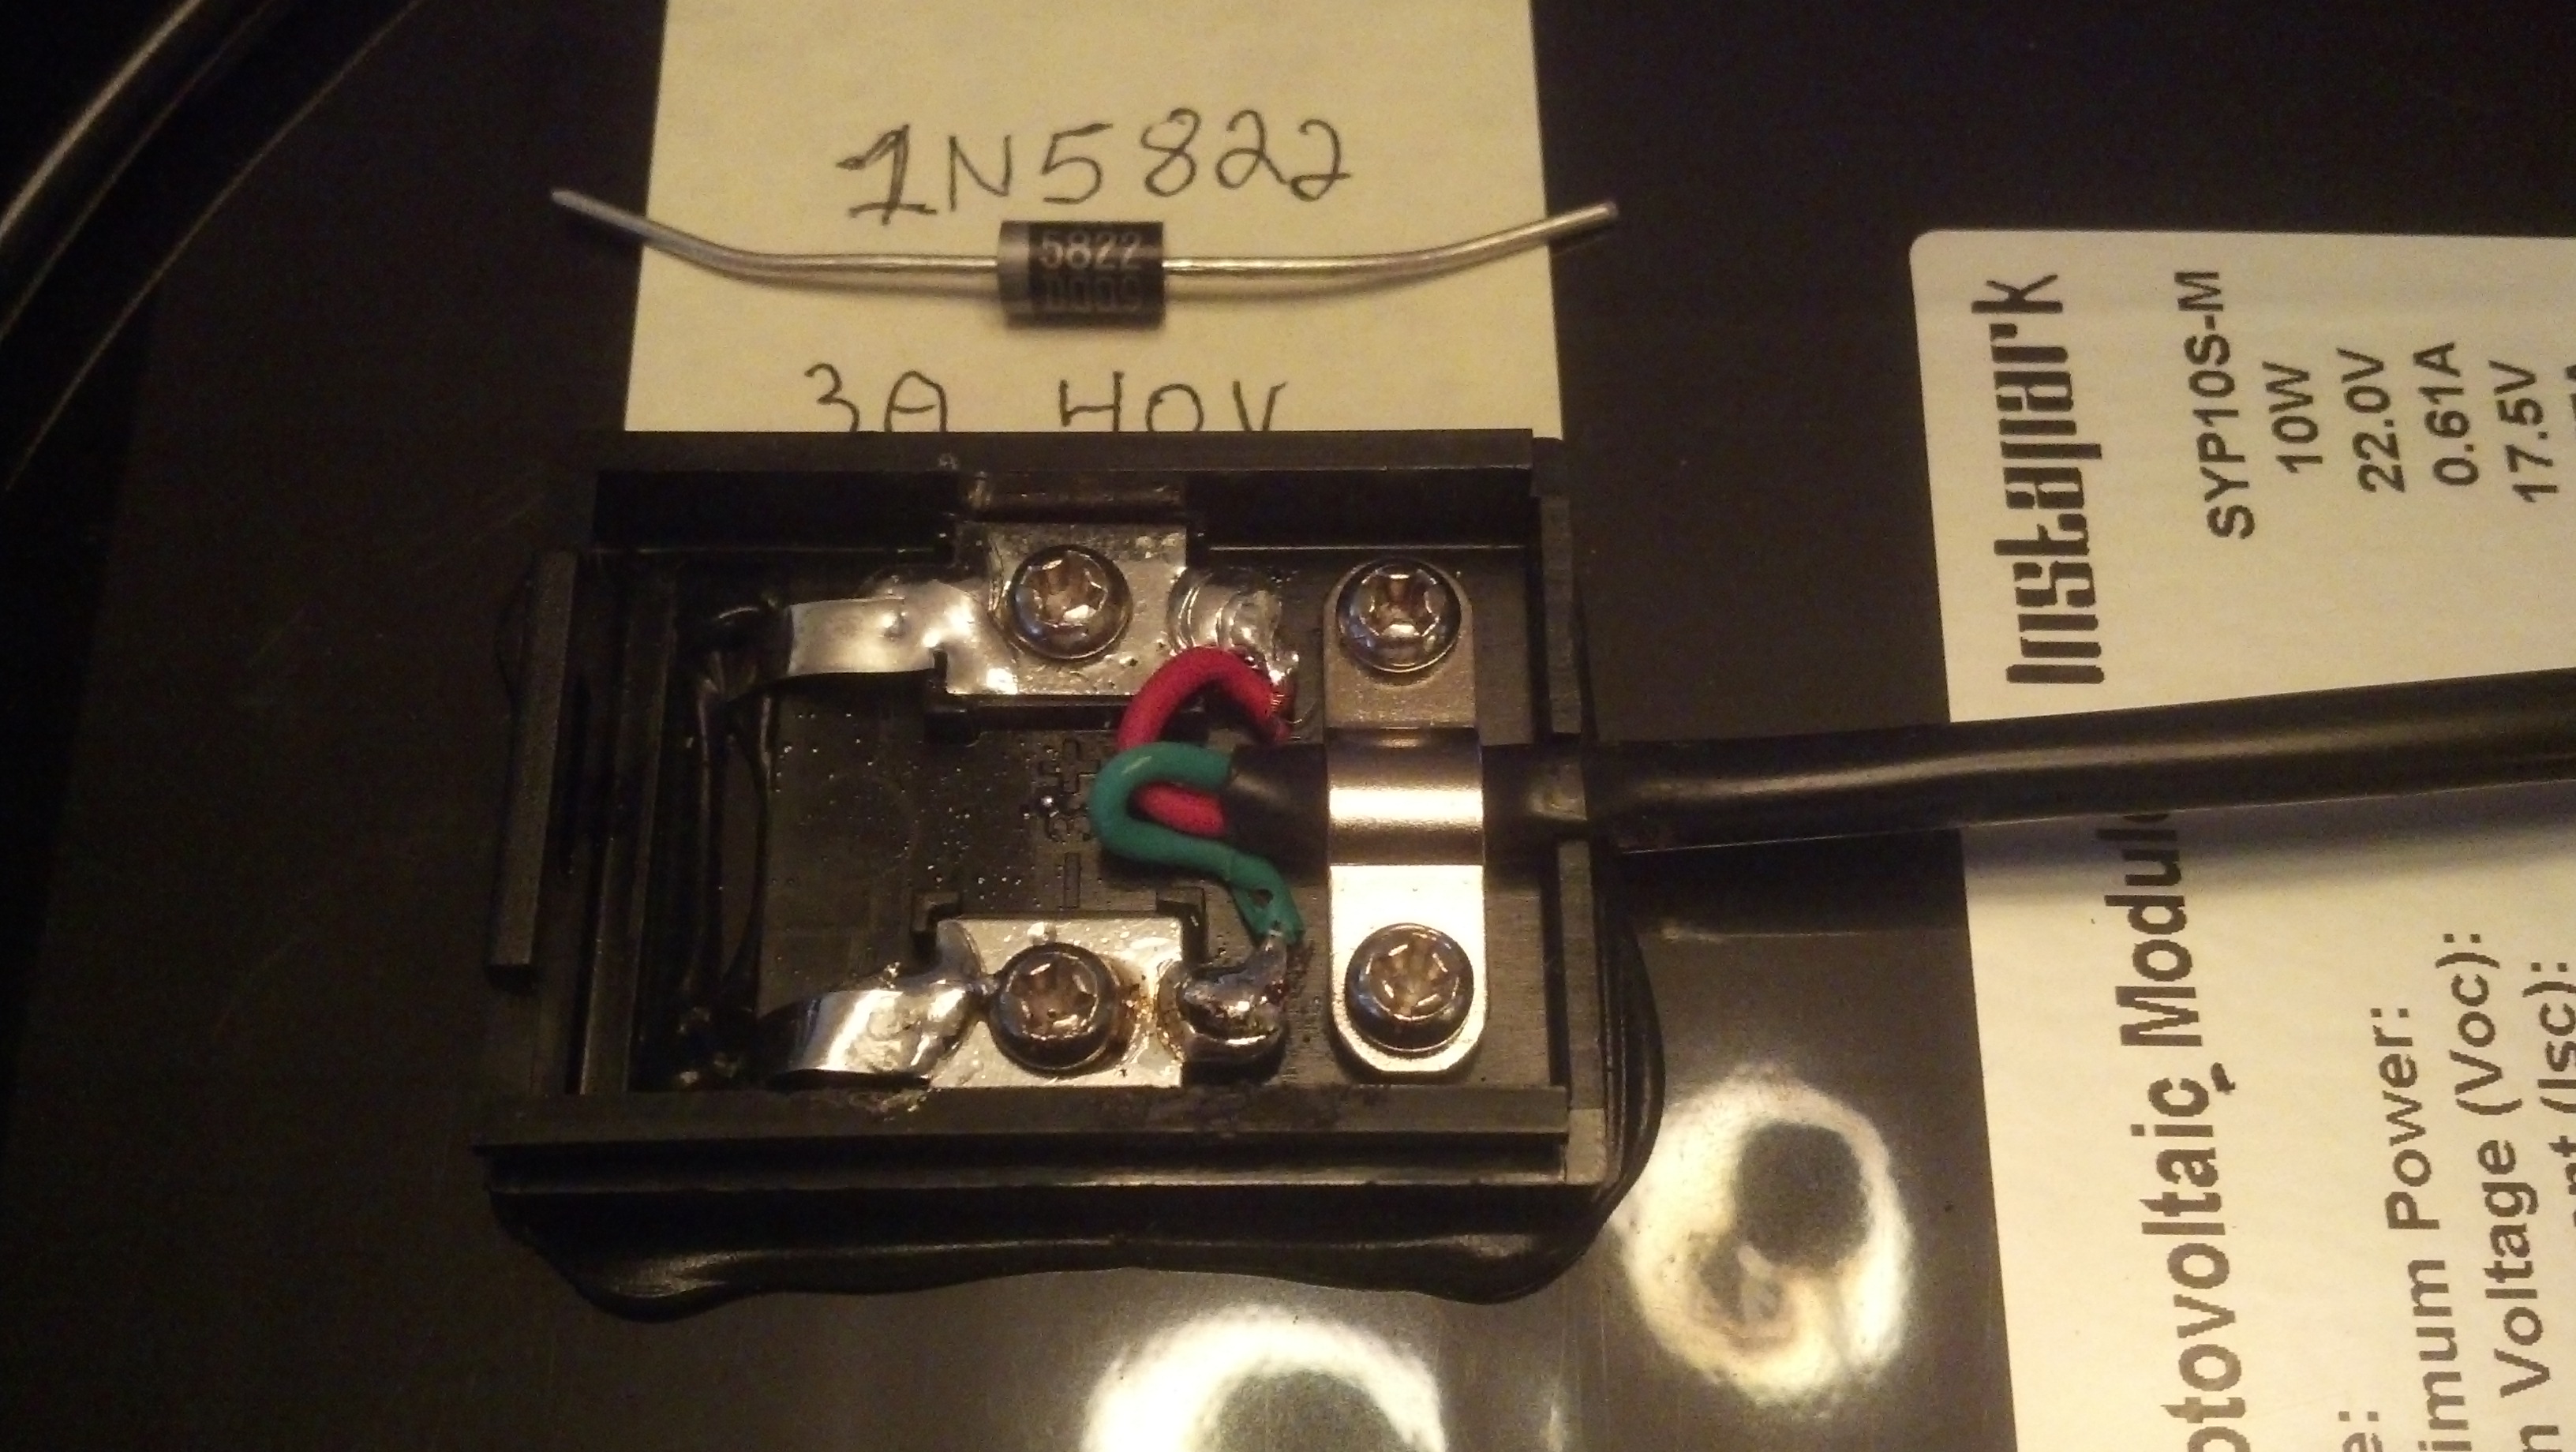
Now, what type of diode? An easy answer for a small
panel is to buy one or more of these 1N5822
Schottky Diodes (hard to get singles so share
with a friend or if you're local I may have extras). Otherwise
read on:
And remember - it's not critical right now so don't worry if the
following makes you reach for some Scoutmaster Water. The
recommendation is for a Schottky
Diode vs a Silicon Diode or a Germanium
Diode . The reason is that Schottky diodes drop voltage
less than Silicon Diodes. Germanium are about the same as Schottky
but harder to get - esp in higher power. You will need a diode
with 3 times the panel's voltage and current ratings. The 1N5822
Schottky diode I referenced is a good fit for a 10 if not a 20
watt panel.
Installation of the diode is conveniently and best in the panel's
wiring box. See also the
Blocking Diode Detail section below. There's usually a Black
( negative / "-" for DC) and a Red (positive / "+" for DC )
set of buss where the panel wires hook on one side and the wire
leads on the other. Cut the bus (or unscrew or unsolder) on
the "+" or red side and install the diode with the arrow facing
away from the panel (eg "feeding your red wire"). Many diodes
don't have an arrow but have a silver band at only one end. That
end is the tip of the arrow for these visuals and goes towards
your red lead out wire.
The saying is "Batteries don't die - they're Murdered". Speaks to
mis-handling, aggressive charging, deep discharging, etc.Sealed
Lead Acid batteries don't like to be fully discharged. If you take
them much below 40%, esp often, you risk damaging them. (this
manifests as "it just doesn't seem to hold as much charge anymore"
and sneaks up on you). So that 8AH battery we're discussing should
be considered at most a 5 or 6 AH battery.
For this application, without using a voltage meter, if you keep
your usage to two phones per night (if fully charged or
re-charged), or one phone and one set of AA batteries, you're OK.
You should not charge all your friend's phones, no matter how
much they beg, plead, whine, until the battery stops charging
anymore. You'd definitely be in "damaging my battery"
territory. And you'd be using up any reserve for overcast days
keeping you perpetually behind.
For this setup - don't worry about it. Details: If you are
charging at 1/C - you don't need a charge controller and you won't
"murder" your battery by charging it from the solar panel. For
this fixed panel this is 1/8 = 1.25 ah and this solar cell
delivers roughly 0.875 ah. So for this configuration it's quite
safe for the battery to just hook it up to the solar panel without
murdering the battery.
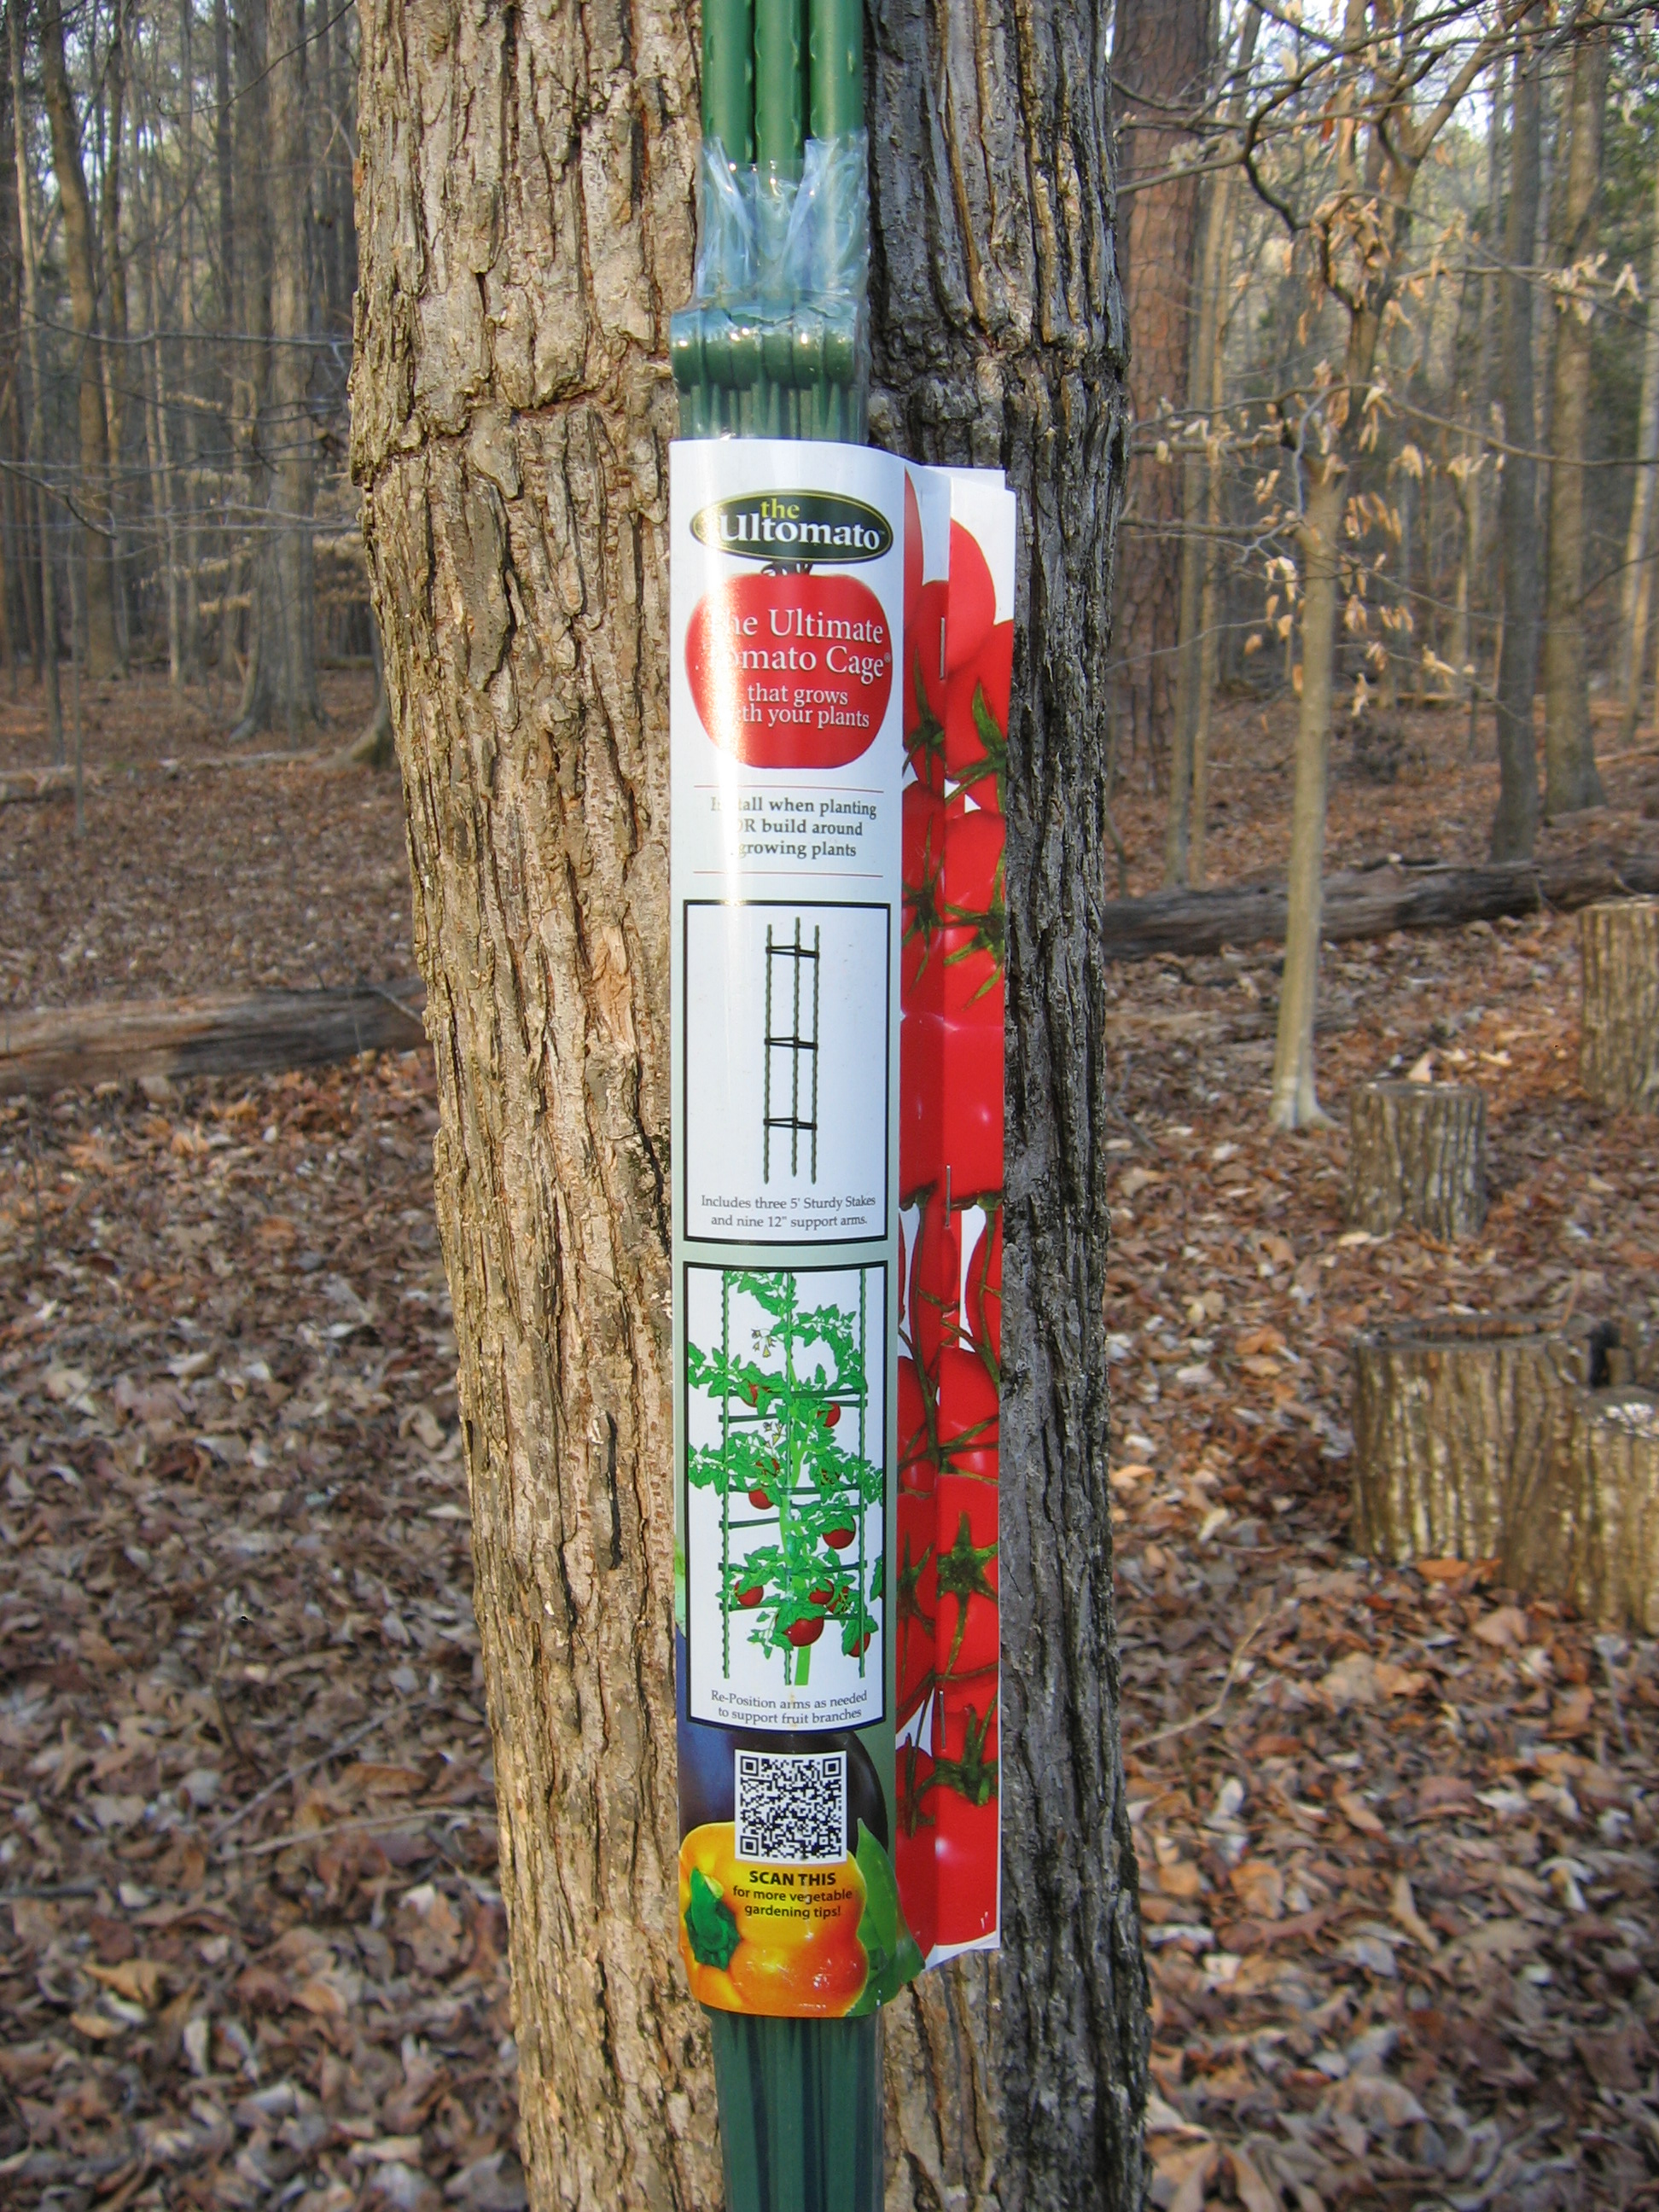
The first thing I have to say is Eh? What? Tomato Stake Kit?
Why not use your Scouting Skills and lash something up locally?
Think about it!
These tomato stake kits make a very nice stand. But why do I need
this? I designed this to get the panel up and mostly above the
rows of tents per Jambo configuration. This to get maximum sun
without shading by tents, chairs, or worry about what direction
our tent rows are aligned.
Now I'll say this - every First Class Scout should be able to
lash together an equivalent stand - and as a leader I fully intend
to do the same as an example. I wanted to show this "leader
expedient" so one isn't bothered by the need to do so - and only
the leaders should have more opportunity (such as your assigned
days when you're stuck monitoring camp).
The poles are thin aluminum covered with tough plastic. They
resemble re-bar but are very light. They're available at your
favorite garden center. I bought mine at Home Depot.
To work well and be stable the stakes must be driven into the
ground. If you don't drive the stakes into the ground then
it will be very tippy - and also very twisty and won't stay up
long nor stay pointing into the sun long.
For Jamboree you'll need to fit them into your duffel bag.
They're still too long for most cars for any trip. For this I cut
each pole in two with a saw. A hack saw will do - but go slow -
and a modeling razor saw is more precise. Clean up the edges. I
also cut an additional 6" off of the top section of one pole. This
is so it will not shade the panel (the picture above does not show
this shortening nor the couplers). Cut this out of the middle of
one section (to leave the top sealed).
Cutting them leaves them (the longest two) right at 30". This is
just barely short enough to fit in your Jambo duffel. It's
nominally 32" long - so you should consider end padding (such as a
shoe) to ensure they don't rip through the ends of your diffel. Or
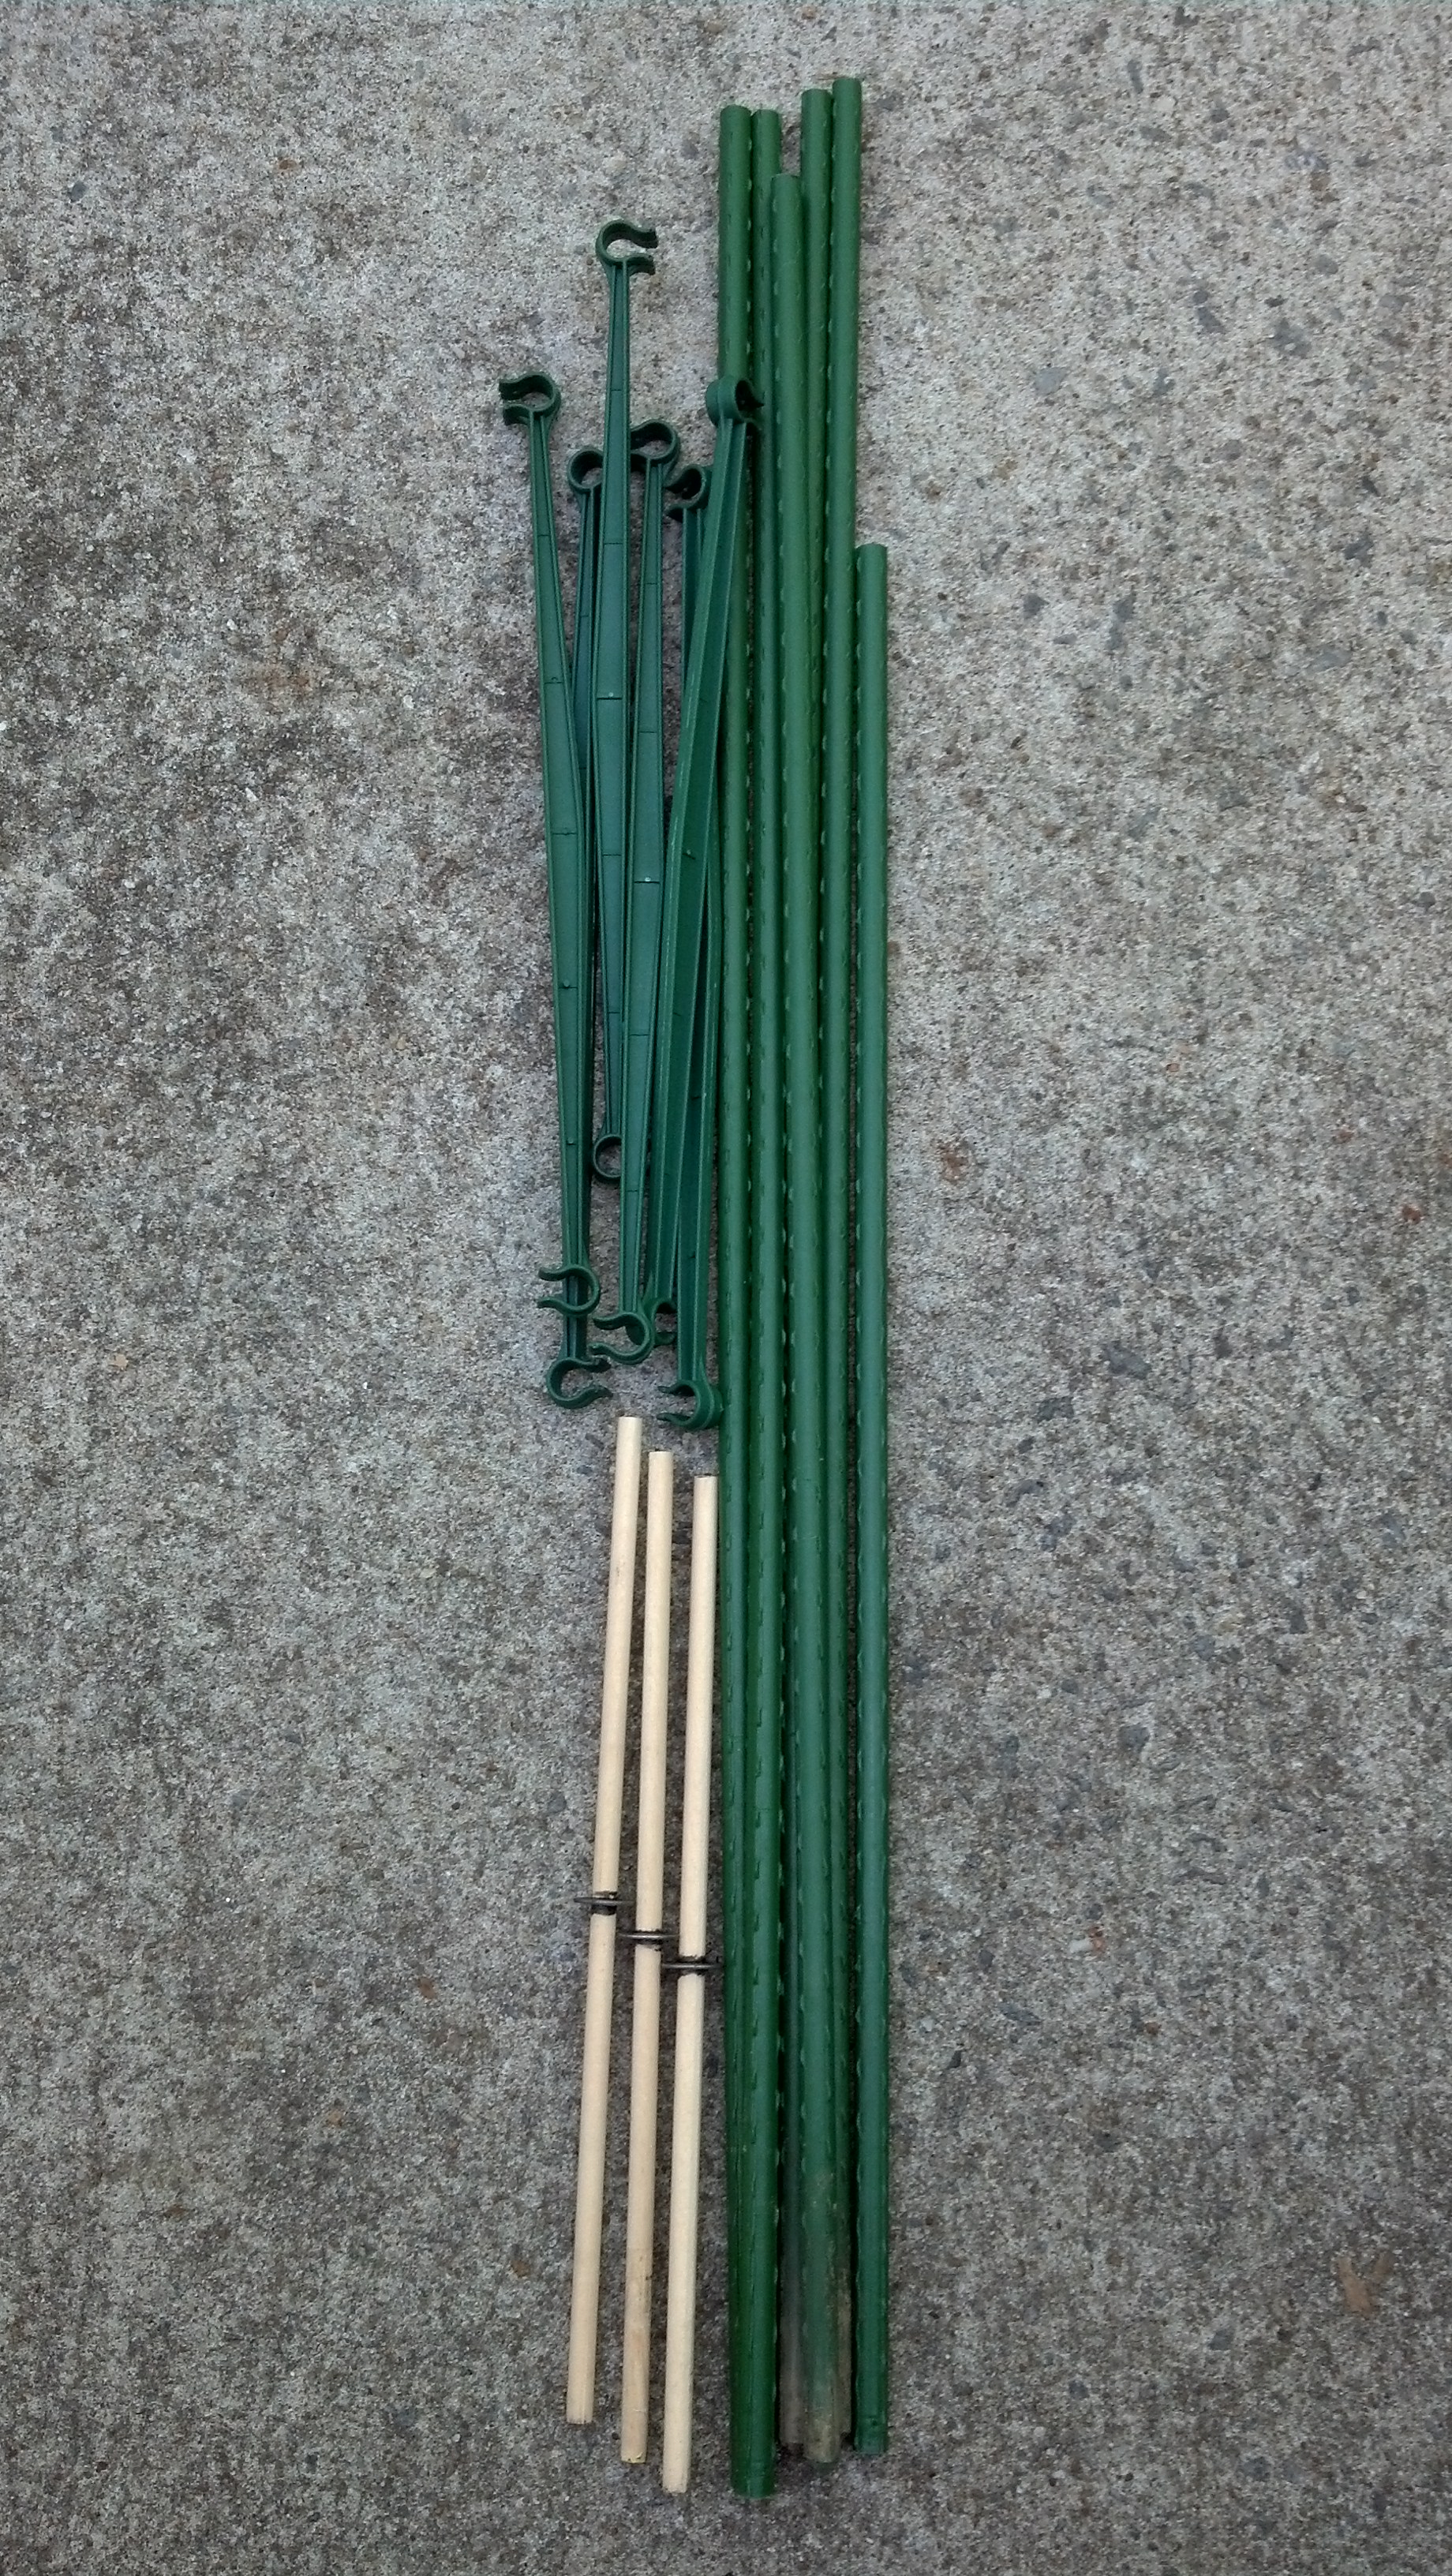
cut into 3 sections and make more joiners.
After you cut the sections you'll need some couplers. I made my
section couplers from 12" pieces of 5/16" wood dowels. Don't use
wood dowels - they break easily in this size - use aluminum or
steel rod or tubing (or bolts with heads cut off etc0
You'll find a longish pieces of that works well enough - and that
while 3/8" dowels would be shorter - a ton of sanding would be
involved. I made a half-way-stop by gluing a 5/16" washer at about
the center point of the dowel. This keeps the dowel sections from
hiding (eg dropping down inside), perhaps permanently, inside the
stake sections at some later point. You could also consider a band
of tape, a half hitch of paracord, or whatever your imagination
comes up with.
I took my setup to the Occoneechee council Jamboree Shakedown and
exhibited both fixed and folding as part of the cell phone
charging activity station. While setting up the fixed base I found
the ground too hard, esp with roots and such, in the only place
that got reasonable sun at my station.
These stakes aren't made to be pounded/whacked much with anything
to drive them into the ground - esp when you've cut them as you'll
peen the cent end. So I couldn't get them the desired 4-6" into
the ground. As a result? The setup was very twisty and also tippy
and I had to install the panel on the lower half only (so not as
high as desired -so a tent perhaps could shade it at Jambo).
While trying to wrangle it when it demonstrated it's twistyness I
broke several of the wood dowels. They're really not very strong
in this size for such a long moment as applied by long poles.
So the LLP Lessons Learned Plan is
Folding solar panels, such as the Goal Zero Guide 10 Plus
Adventure Kit, are good compromises for portability. But they are
compromises vs Fixed Base type solutions. You can save weight and
space but it's more important to know what and how much you need.
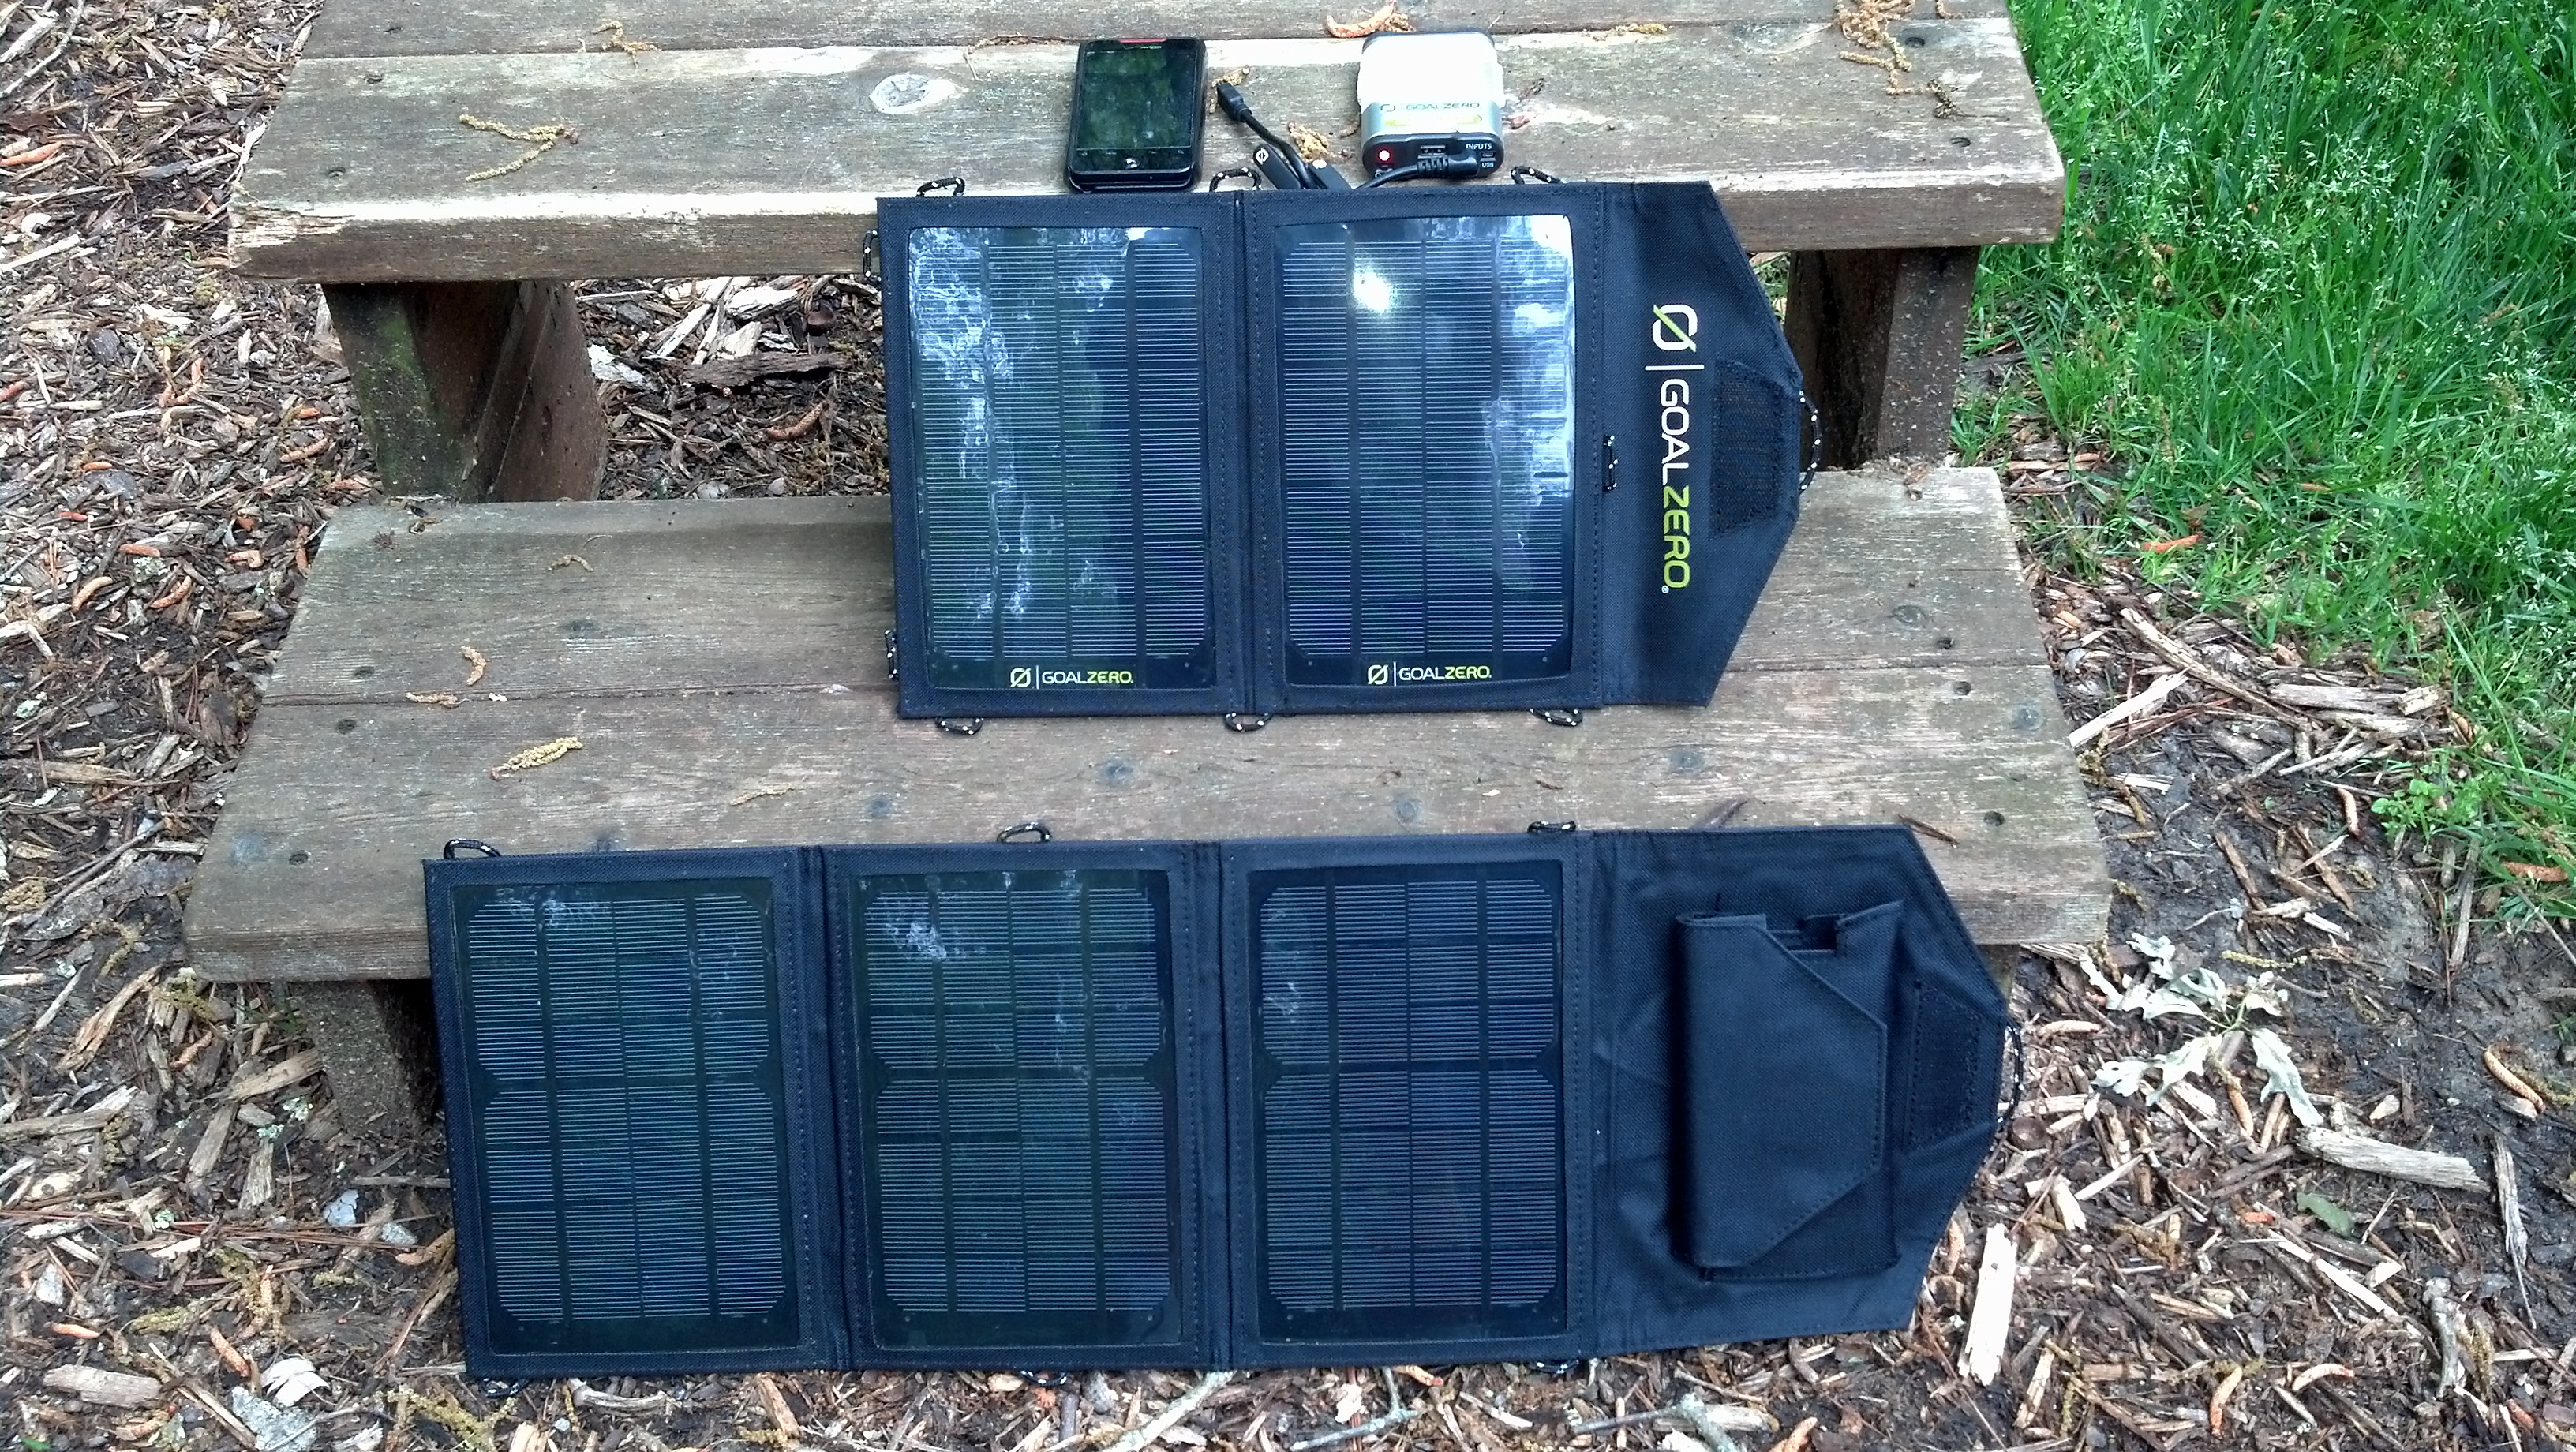 |
| Goal Zero Nomad 7 Panel (Guide 10 plus
Adventure Kit) (above) and Opteka 10 Watt Panel (Below) |
These panels have cordlets that make it easy to affix them to packs ,etc, bu they're more difficult to set up fixed base (because they're flexible). They're also a big bigger for the same power rating - but the fabric makes them lighter (the GZ Nomad 7 shown is about 1.5#). These are ruggedized and are otherwise pretty tough.
An important caveat to note is that the folding panels,
esp up to about 10 watts, are 6 volt nominal panels. That means
you can't hook them right up to a 12V battery for
charging/reserve. You generally need to use these with USB output,
their associated devices, or a 12 V output (with conversion
losses, and only if available).
That said, the Opteka (shown below) provides equivalent power (10
watts) as the fixed base Instapark panel shown above. And it's
half the weight. Now, at 7 watts, the Goal Zero Nomad 7 certainly
falls more into the personal use category, but is packable.
Another Caveat to note is that these panels are often
deployed in opportunistic manner - such as strapped to a pack - or
layed out on the ground. As such be careful in your expectations.
As we noted, non full sun means non full power, and often
disappointingly so. So don't expect to strap one to your pack,
forget about it, and expect to have a full charge by days end.
Yet another caveat (did I say that? Are these all
caveats?) is as most already know, phones and their brand and
model have affinities for what they like and don't like for
charging. Most will charge anyway - but perhaps not fast - so you
really MUST test the panels et all against your equipment ahead of
time.
The Goal Zero Guide 10 Plus Adventure Kit is available from
Amazon.com as well as ScoutStuff.org at the same price. I'm
becoming a fan of it. Note that the panel itself (The Nomad 7)
isn't useful without something to have it charge. And the most
appropriate is the Guide 10 Battery pack as there's a direct
charge cable from panel to Guide 10 (without built in converters).
This is a 6V panel rated at 7W. (that means likely closer to 5
but I haven't had time to measure yet). If you mind your sun you
can get two full charges of it's 4-AA battery set out of it. Note
that "minding your sun" means staying with it - or leaving it out
- and changing batteries at noon or so. Somewhat different than
fixed-base-unlikely to get stolen setup.
The Guide 10 pack is a nice combo - with USB and direct-solar
input (charging Guide 10) and USB output for charging your phone.
It uses 4xAA NiMH batteries. Note you can swap these out. And
Should. But note it only charges 4 ... or none ... so it's less
useful for topping off your 2xAA flashlight batteries.
For charging your phone - note that one charge of Guide 10 pack
*might* nearly top off a modern smart phone. It won't for my
RazrMaxx - but it's got a 3300 MaH battery, vs 1400 for iPhone 5,
vs 2200 (?) for Thunderbird. So if you really want a full charge
every day you'll need at least one more set of batteries. And if
you want reserve for a cloudy day? Well, you're pushing this panel
and may well need to conserve phone battery.
Outputs - it has direct panel out - useful for Guide 10 Plus
(called Super Charge Cable). Also USB and 12V. These latter two,
USB and 12V go through converters which cost you 10-20% of the
power. So use if you must but don't think they're free.
For the Guide 10 pack I have been able to get two full charges a
day out of the accompanying Nomad 7 panel - but that's with full
sun and minding the panel facing directly into the sun.
For charging a phone, different models will respond differently
to the Guide 10 and it's ports. My Razr Maxx went to 26% (near
max) for an hour, but dropped to 2%. It continued to charge
overnight - but was slower - and because of that I couldn't put in
a 2nd set of batteries to get it to 100%. YMMV - and test against
your equipment!
This sure is a cute looking kit. But I'm not sure how suitable it
is for current technology. First the panel is a 3.5 watt panel.
Yup. Half the power of the Nomad 7 panel. And that's getting
light. Is it OK? I'd answer that by asking if it could get and
keep me charged up.
The Switch 8 packs are moderately small - and I'm not sure they'd
fully charge any modern anything. Certainly not my Razr Maxx.
It might work for you - but I'd test for sure. I think a better
combo, if you're stuck on the (cute) Switch 8 batteries, is to use
a Nomad 7, Opteka 10, et all to charge them through USB instead of
the otherwise included (combo) Nomad 3.5 solar panel.
To try to save money - and to hack, I bought an Opteka
SP-10W. It's a 6V 10 watt panel (the Nomad 7 is 7 watt) and
that fits with the one extra panel shown in the picture. Remember
you're comparing it to Guide Zero Nomad 7 (as the Adventure kit
includes to Guide 10 Plus pack).
It's a good, solid, panel, but features only two USB output
ports. No DC out and now 12V out. (the Nomad 7 has all three).
It's a bit longer (one panel) but features 10% more power.
Personally, I'm hacking the power cable to be able to
direct-charge and also hook up other stuff.
With power feed hacking this could power Guide 10 Plus - and
probably two at once. (cut and hack in a GZ "Super Charge" cable).
I've also just used the USB out to charge my phone as well as a
Guide 10 Plus battery pack. It works. But just like other folders
- you need to figure out something to store the power into
if you don't want to either leave - or be tethered - to your
charger/phone etc.
What about the Solar Joose and others? I may get into this some
more, and the Solar Joose may be closer to the top of the heap,
but think of these as "reserve batteries with some token solar
charging ability". Or in other words - they may well get you
through a long weekend, but at some point the entire thing and
your phone will need charging, and that's when you pay the
piper.
So as for any trip, think about what your needs are, what the
weather will be like, and what your reserves, and contingeny
plans, are. For example, Solar Joose may be quite fine providing
you can keep it in the sun here and there - AND - top it off every
few days for Jambo.
Lagniappe means essentially "a little something extra". For this
page it's where we may bridge out of the Simple in Solar.
But for the astute and/or inquisitive reader there's some more
gold here that may optimize your solar experience.
In the South East, in general (it can vary by season), the
industry figures on about 5 hours of useful sun per day. So if you
have a 10 watt panel, the most you can hope for is 5x10==50 watt
hours of power. (since the Instpark 10 W gives us solid 7, we
figure on 35 real watt-hours).
What do I do with what hours? Let's tie that together ... soon
...
How much power do you need? How many watts is enough? That's a
good question. And I need to expand.
Power is Volts times Amps. MaH is Milli-Amps per Hour. So a 3.3V
NiMH (all phones) times 3300 MaH (my Razr Maxx) == ~10 Watt
Hours.
As with any units - you can do math on those. So in a perfect
world, a perfect 10 watt solar panel, for 1 hours, would give 10
watt hours and could fully charge my phone.
This all gets fuzzy - as different circuits have different
efficiencies as do batteries, etc.
The thing to think of is MAX power for your panels will give
MINIMUM charge times for your batteries, phones, etc.
My Droid Razr Maxx (3300 MaH battery) took close to 15WH of power
to charge; about 8 or so for iPhone 5 (1400 MaH battery). So for
my son an I, that's 23 Watt Hours, to replace what I take from my
1280 base SLA battery at night. Or 7W (actual) == 3.5-4 hours of
good sun.
That gets into reserve. We note that half my 1280 SLA is about
40-50 watt hours. So my panel/battery is good for two people two
days - max - and then we must recharge. More than that and we're
hurting the battery (some) and will also need a really long
recharge time for the SLA. Remember it took 3 or 4/5 of our daily
sun energy just to replenish one day, so we'll be running behind
for a several days to make up.
Think now of "what else". My what else is
AA's for my Garmin GPS, my head lamp, my tent lamp, and perhaps
the opportunistic begged charge (trade for something!). So I'm
going to use that 10W / 1280 combo just for myself.
Reserve - for places with some power can be handled by
the occasional opportunistic charge. So my setup, especially if
shared, with some bad weather (or other AA charged, stolen
charges, etc), could get by with only needing to top off/overnight
the main packs every several days. That still sure beats needing a
solution daily ... which is why you're reading this as anyway!
The Minty Boost is an Adafruit project. It's what's called a joule
thief circuit and is nice because it can suck all, and I
mean all, the juice out of your batteries. For example, when the
Guide 10 had mostly given up charging my phone, those 4 batteries,
two at a time, finished charging my phone through the Minty Boost.
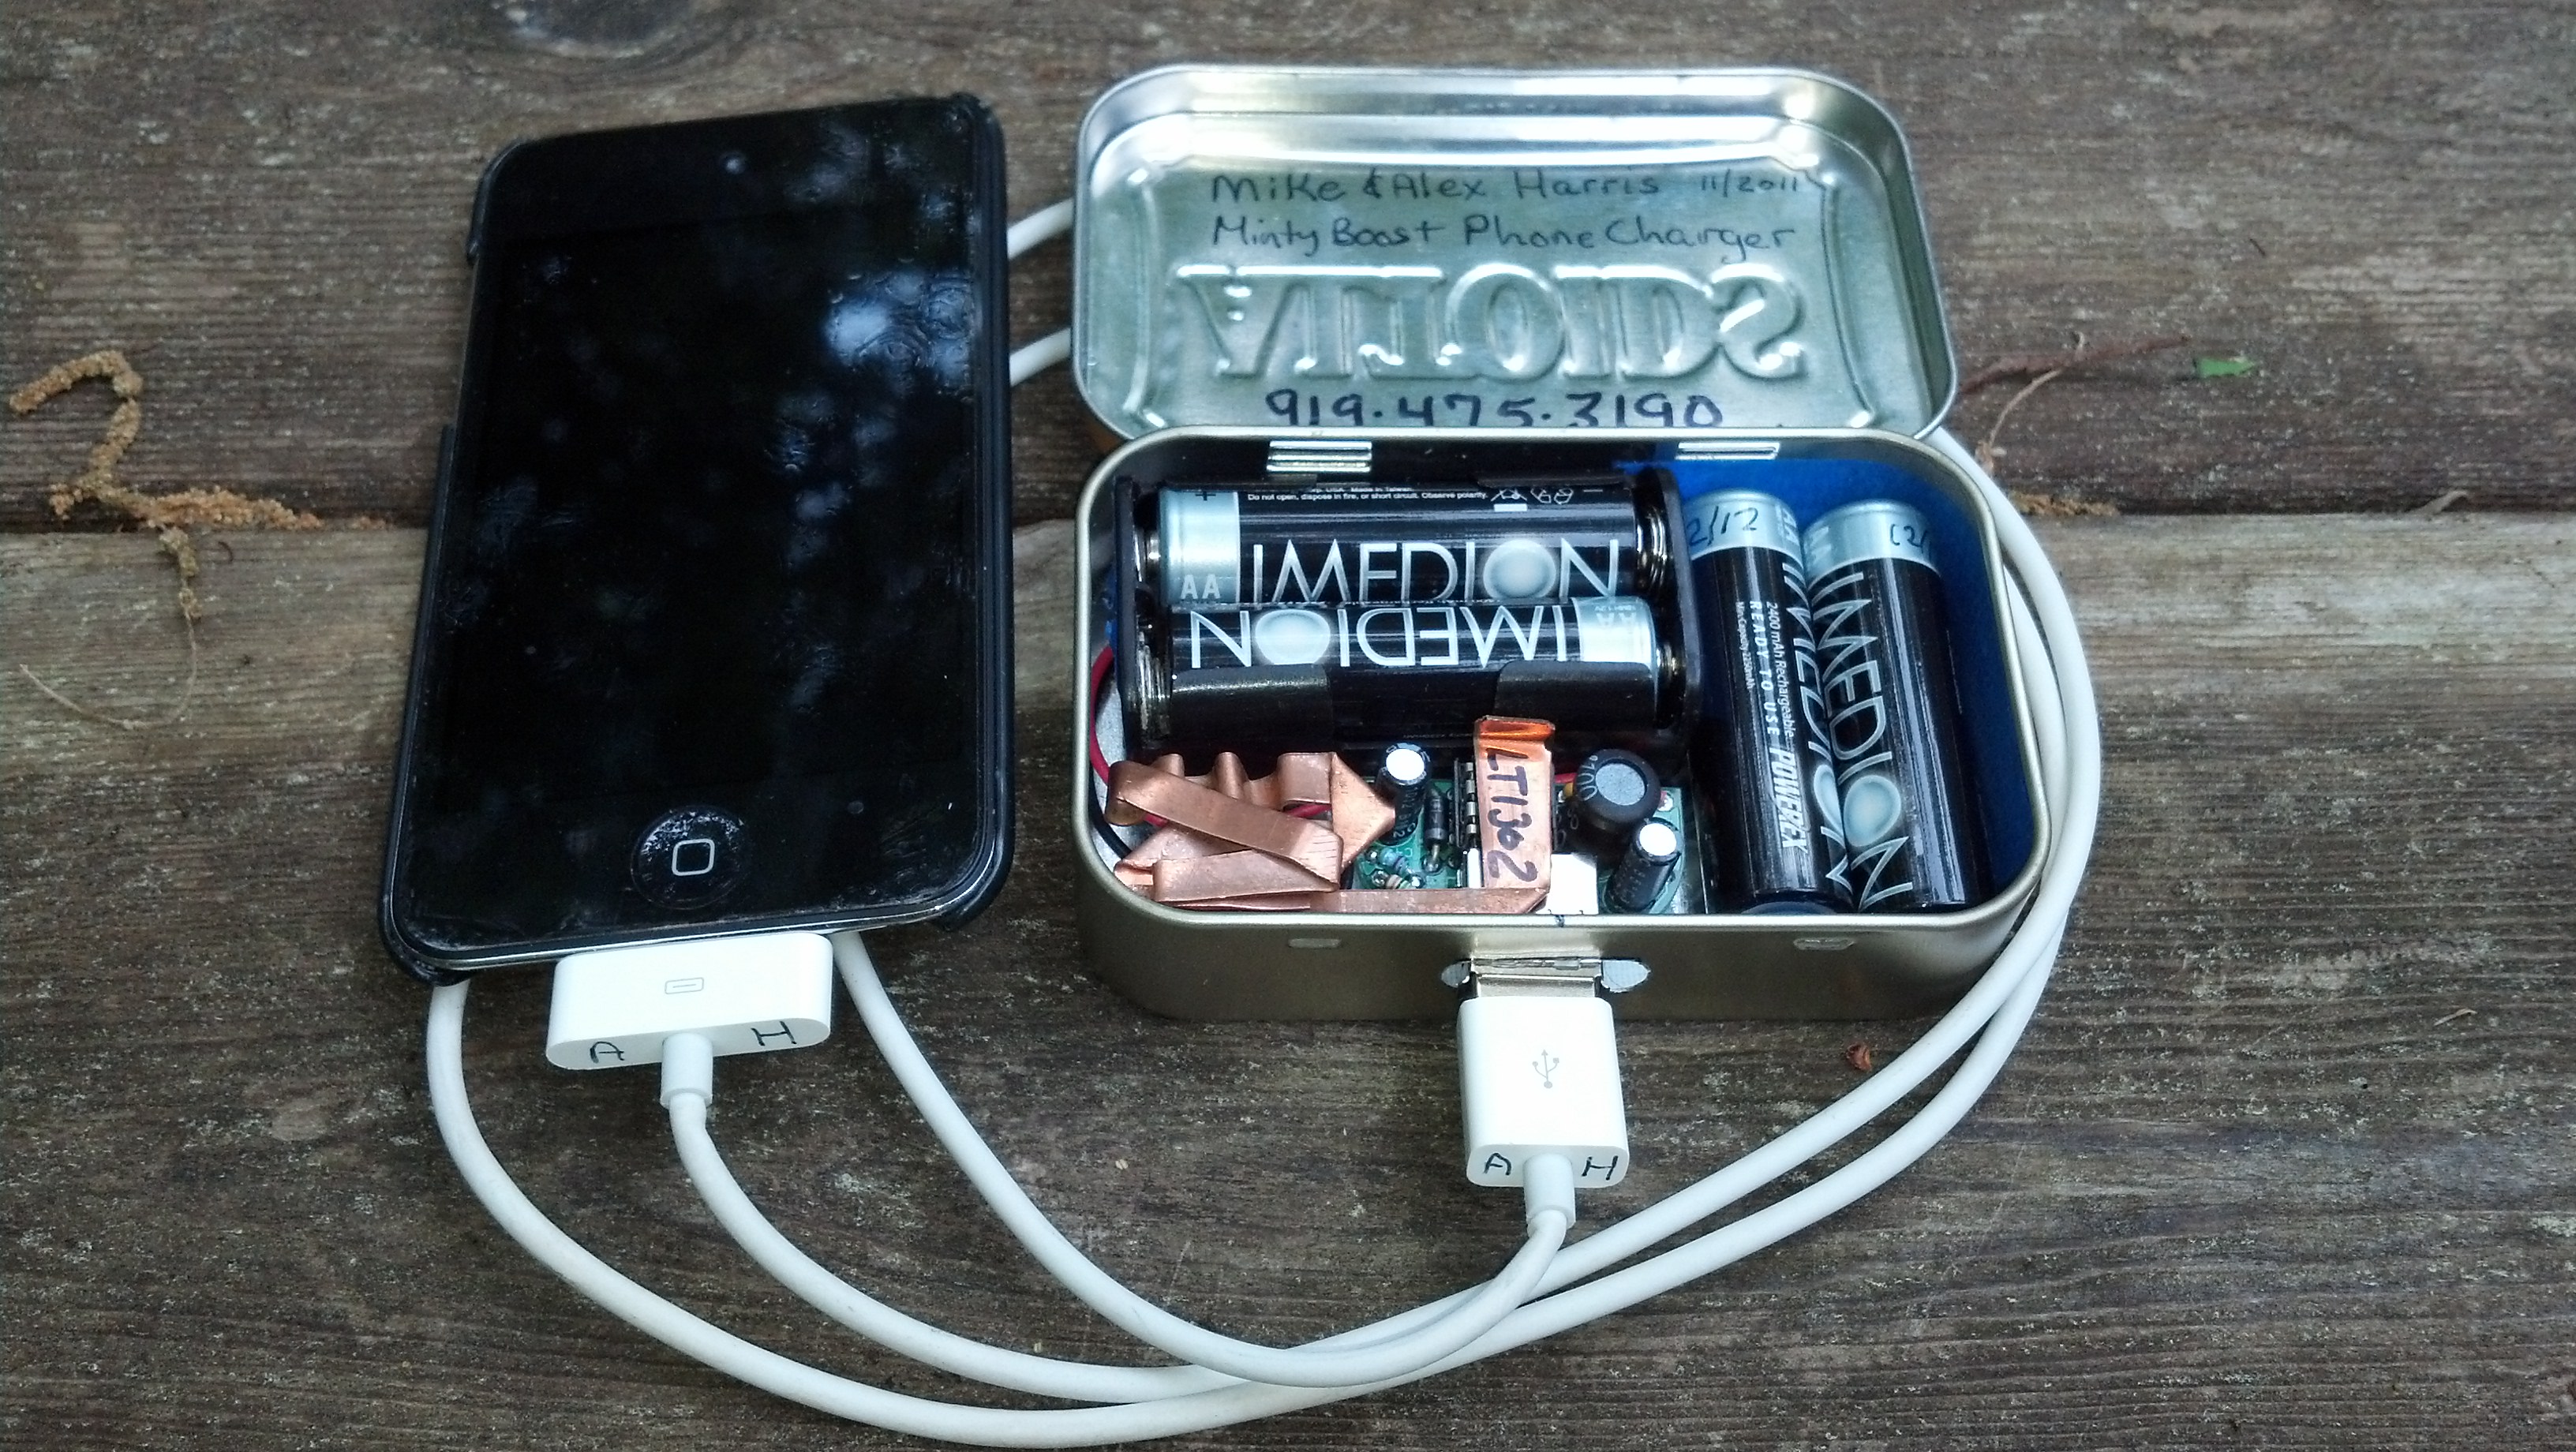 |
| Minty Boost by Adafruit. With spare set of
batteries. And heat sink (optoinal but nice). Loose battery
compartment has anti-short blue tape. |
This is a kit and scouts should note that constructing this kit
could be a great start or finish to the Electronics merit badge.
I'll note also that I use this to finish off Alkaline AA
and AAA batteries. Most electronics (except my Fennix and other
good flashlights) stop working well below 70-80% of charge (by my
Z-tester). The Minty Boost (and Fennix, et all) can suck the
remaining power out - really giving you 2x the power from a
battery. Nice eh?
Note also that this device can murder your NiMh batteries
so only leave it hooked up long enough to top off your phone. Two
NiMH also aren't enough to charge say my Droid Razr Maxx fully
(needing 4 batteries for that).
I like these just for "quick boost" mode with some AA's. I'd
suggest the Switch 8 is somewhat equivalent in battery+charger
built in. But, nicely, this uses AA, so just pop more in.
Since it's USB, as with anything, check compatibility. There were
more problems with earlier versions - but you may still need to
select some resistors (included).
Remember it's a kit with some soldering and metal cutting (easy)
required. And doesn't come with batteries or USB cables.
We'll talk more about SLA, NiMH, LiOn, and other batteries here.
I'll just list a few points.
| Power Density |
Efficiency |
Charging |
Uses |
|
| Sealed Lead Acid (SLA) |
Medium |
High |
Common 12V |
UPS etc |
| NiMH |
High |
Low |
Common AA/AAA |
Flashlights etc |
| LiON |
High |
Medium |
Special (embedded) |
Phones, tablets |
A blocking diode keeps the battery from reverse discharging into
the solar cell at night. It's not a huge deal - esp if you
disconnect the battery - or other electronics are involved (in
between battery and panel) as they'll almost always block.
Note that the orientation of the diode is important (see 2nd
picture) and usually Schottky for low loss. The 1N5822 is a good
choice for panels in this range and up some too.
You won't need this for Nomad 7, Opteka, etc, as those couple to
intervening electronics. You should consider this for Fixed Base.
 |
 |
This content is copyright Mike Harris, 2013, and may be freely
distributed provided copied in whole and attributions made. I
encourage Jamboree and other units to link to this page.